
Workflow Start
A Workflow is a sequence of activities that are linked together to automate business-critical tasks such as data acquisition, analysis, and reporting. You can execute a Workflow instantly or schedule it for execution. You can also view the status or execution history of an executing Workflow.
The Workflow Start functionality enables you to set up triggers for initiating Workflows. Infoveave provides four types of Workflow start triggers, each serving a different purpose.
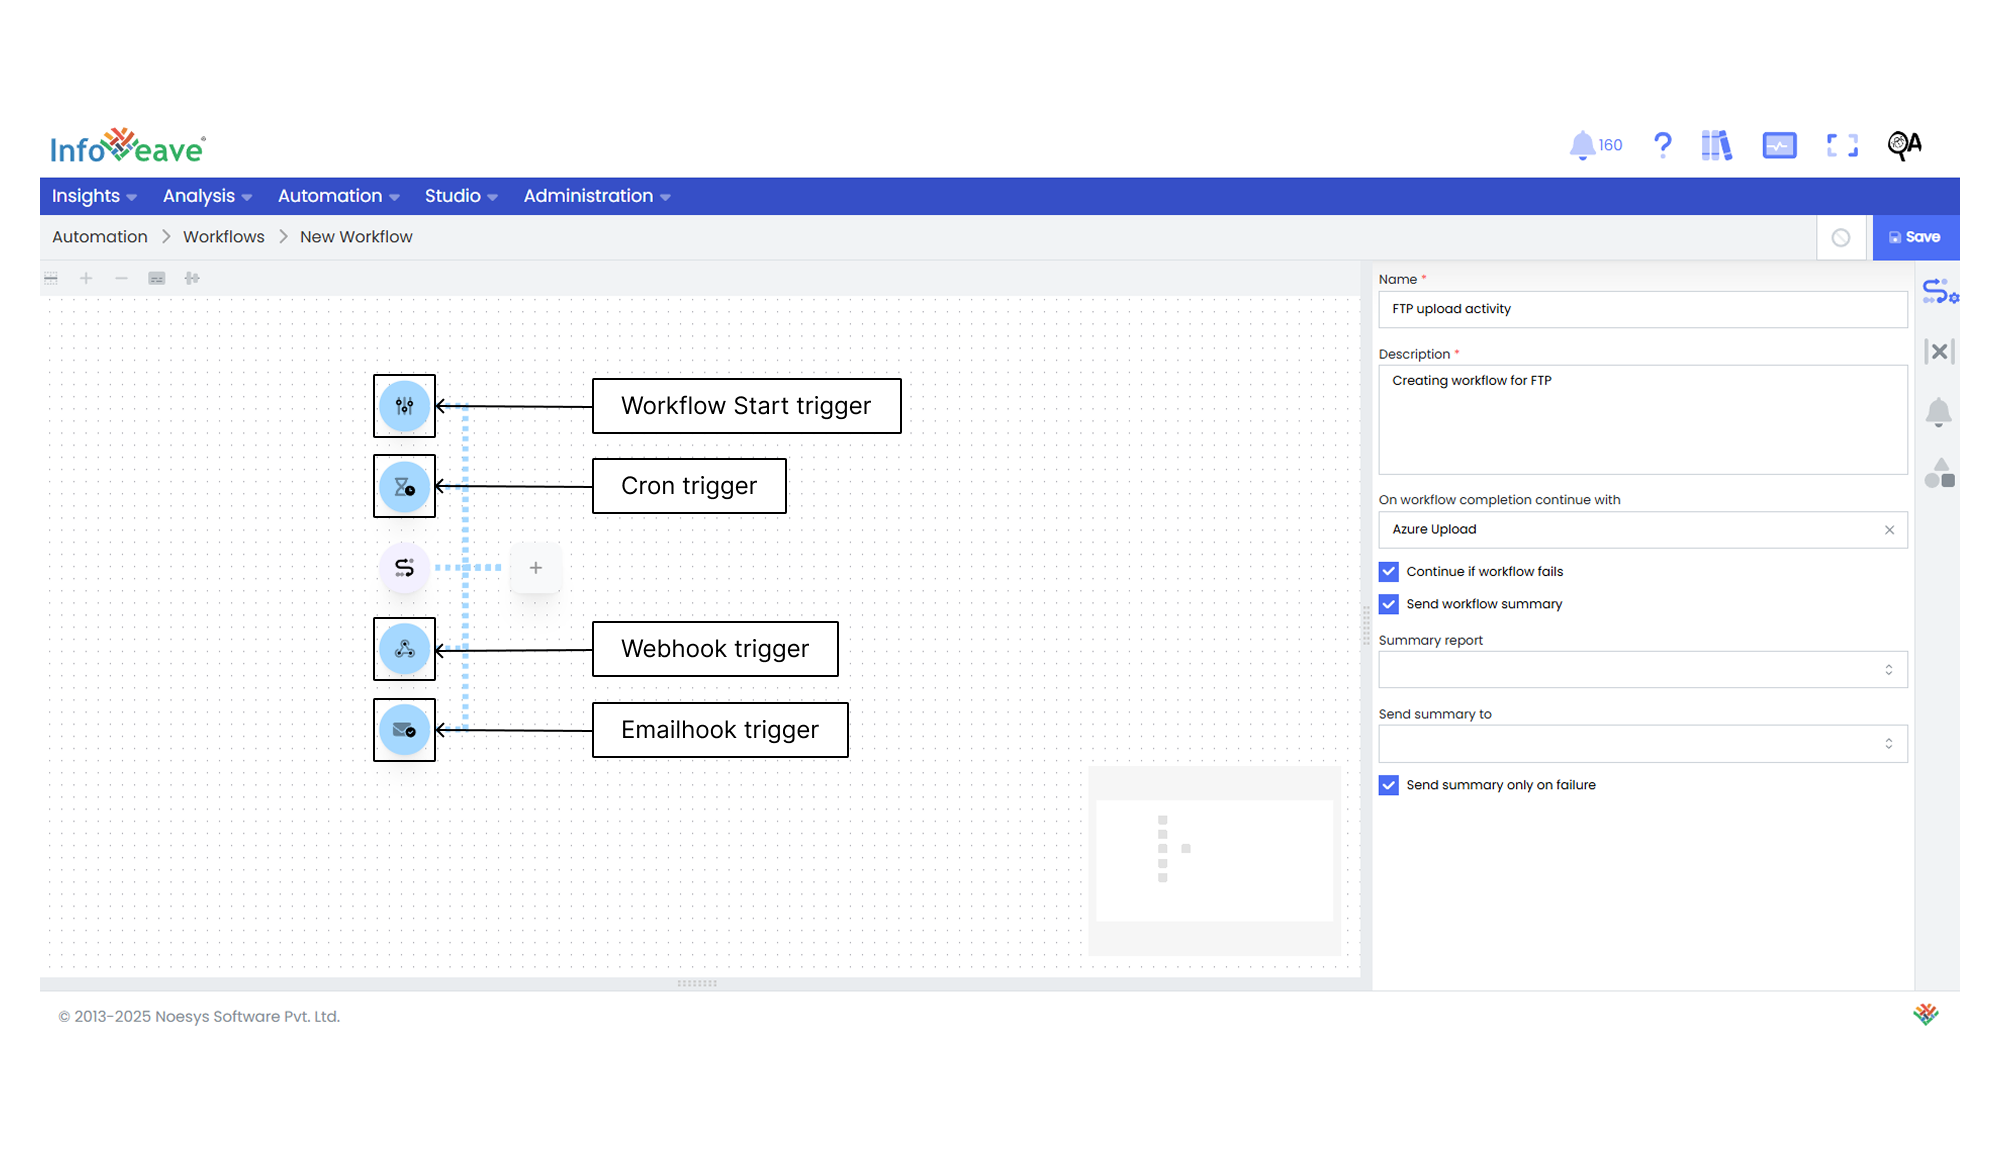
Workflow Start trigger This trigger allows you to start the Workflow manually. It gives you the flexibility to initiate the Workflow whenever you find it necessary, providing manual control over the process. You can upload files or JSON data that might be required for your Workflow activity.
Cron trigger The Cron trigger enables you to schedule the Workflow to run at specific intervals using CRON expressions. This trigger is useful for automating repetitive activities that need to occur at regular intervals such as daily, weekly, or monthly reports.
Webhook trigger With the Webhook trigger, Workflows can be triggered by HTTP requests sent from external systems. This allows seamless integration with other applications and systems, enabling Workflows to be initiated based on external events or data changes.
Emailhook trigger The Emailhook trigger initiates the Workflow based on incoming emails. You can set up rules to trigger the Workflow when specific emails are received. This allows for automated processing of email-based activities or notifications.
Each trigger type in Infoveave offers unique advantages. You can select them based on your specific Workflow requirements and integration needs.
Workflow Start trigger
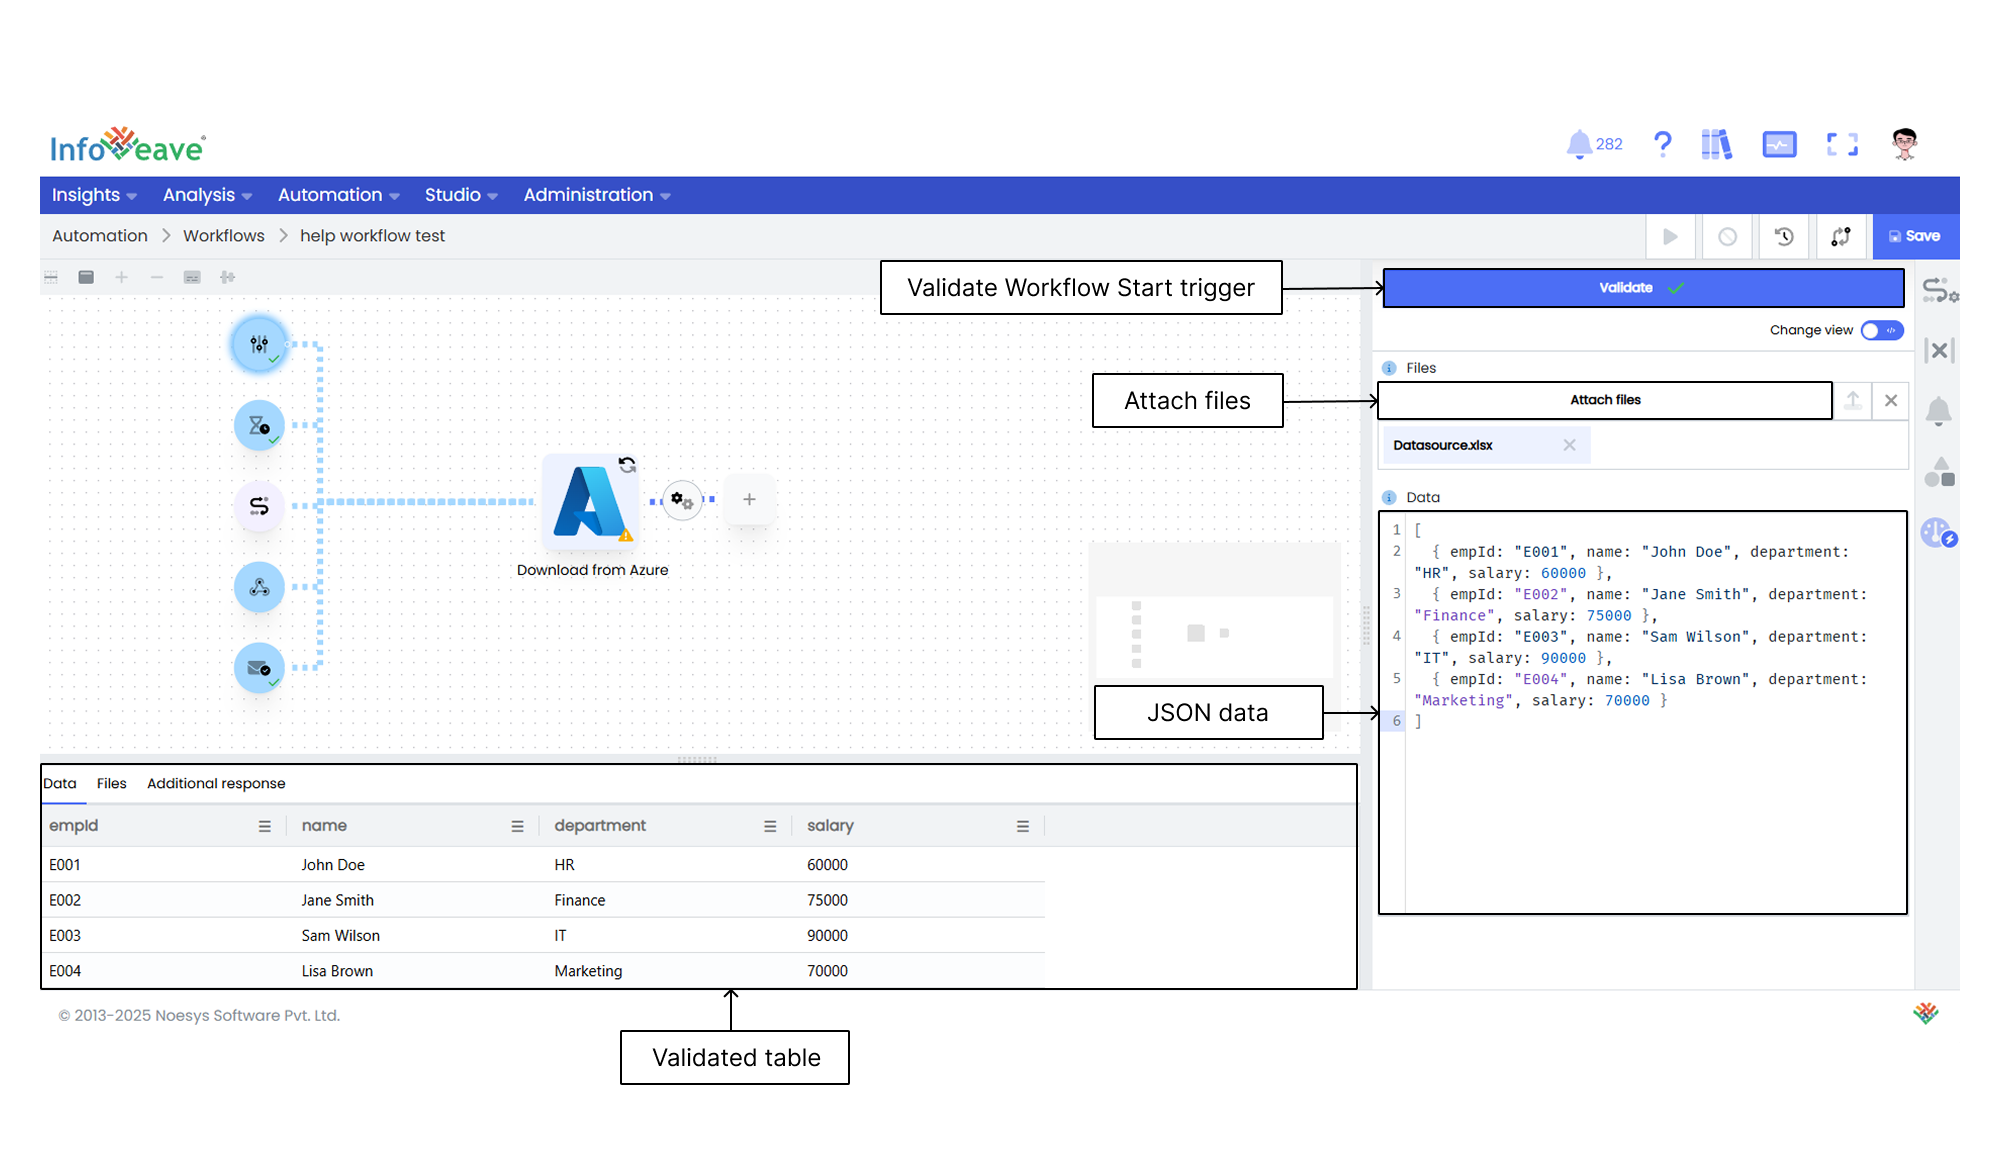
The Workflow Start trigger allows you to start the Workflow manually through an interface. You can upload an array of JSON data or multiple files to initiate a Workflow. This functionality allows you to manually input data or upload files that contain the necessary information to start the Workflow process. Workflow Start triggers are ideal for Workflows that need to be initiated on demand.
To set up the Workflow Start trigger, follow the steps below.
- Select the Workflow Start trigger icon.
- Enter the raw data in JSON format in the data field.
- To upload a file, click on the Attach files button and select the required file.
- Click on the upload icon to upload the attached file or JSON data for execution.
- Click on the Validate button to validate the data and all the uploads.
- The raw data entered will be showcased as Data after validation.
- The file uploaded will be showcased as Files after validation.
Cron trigger
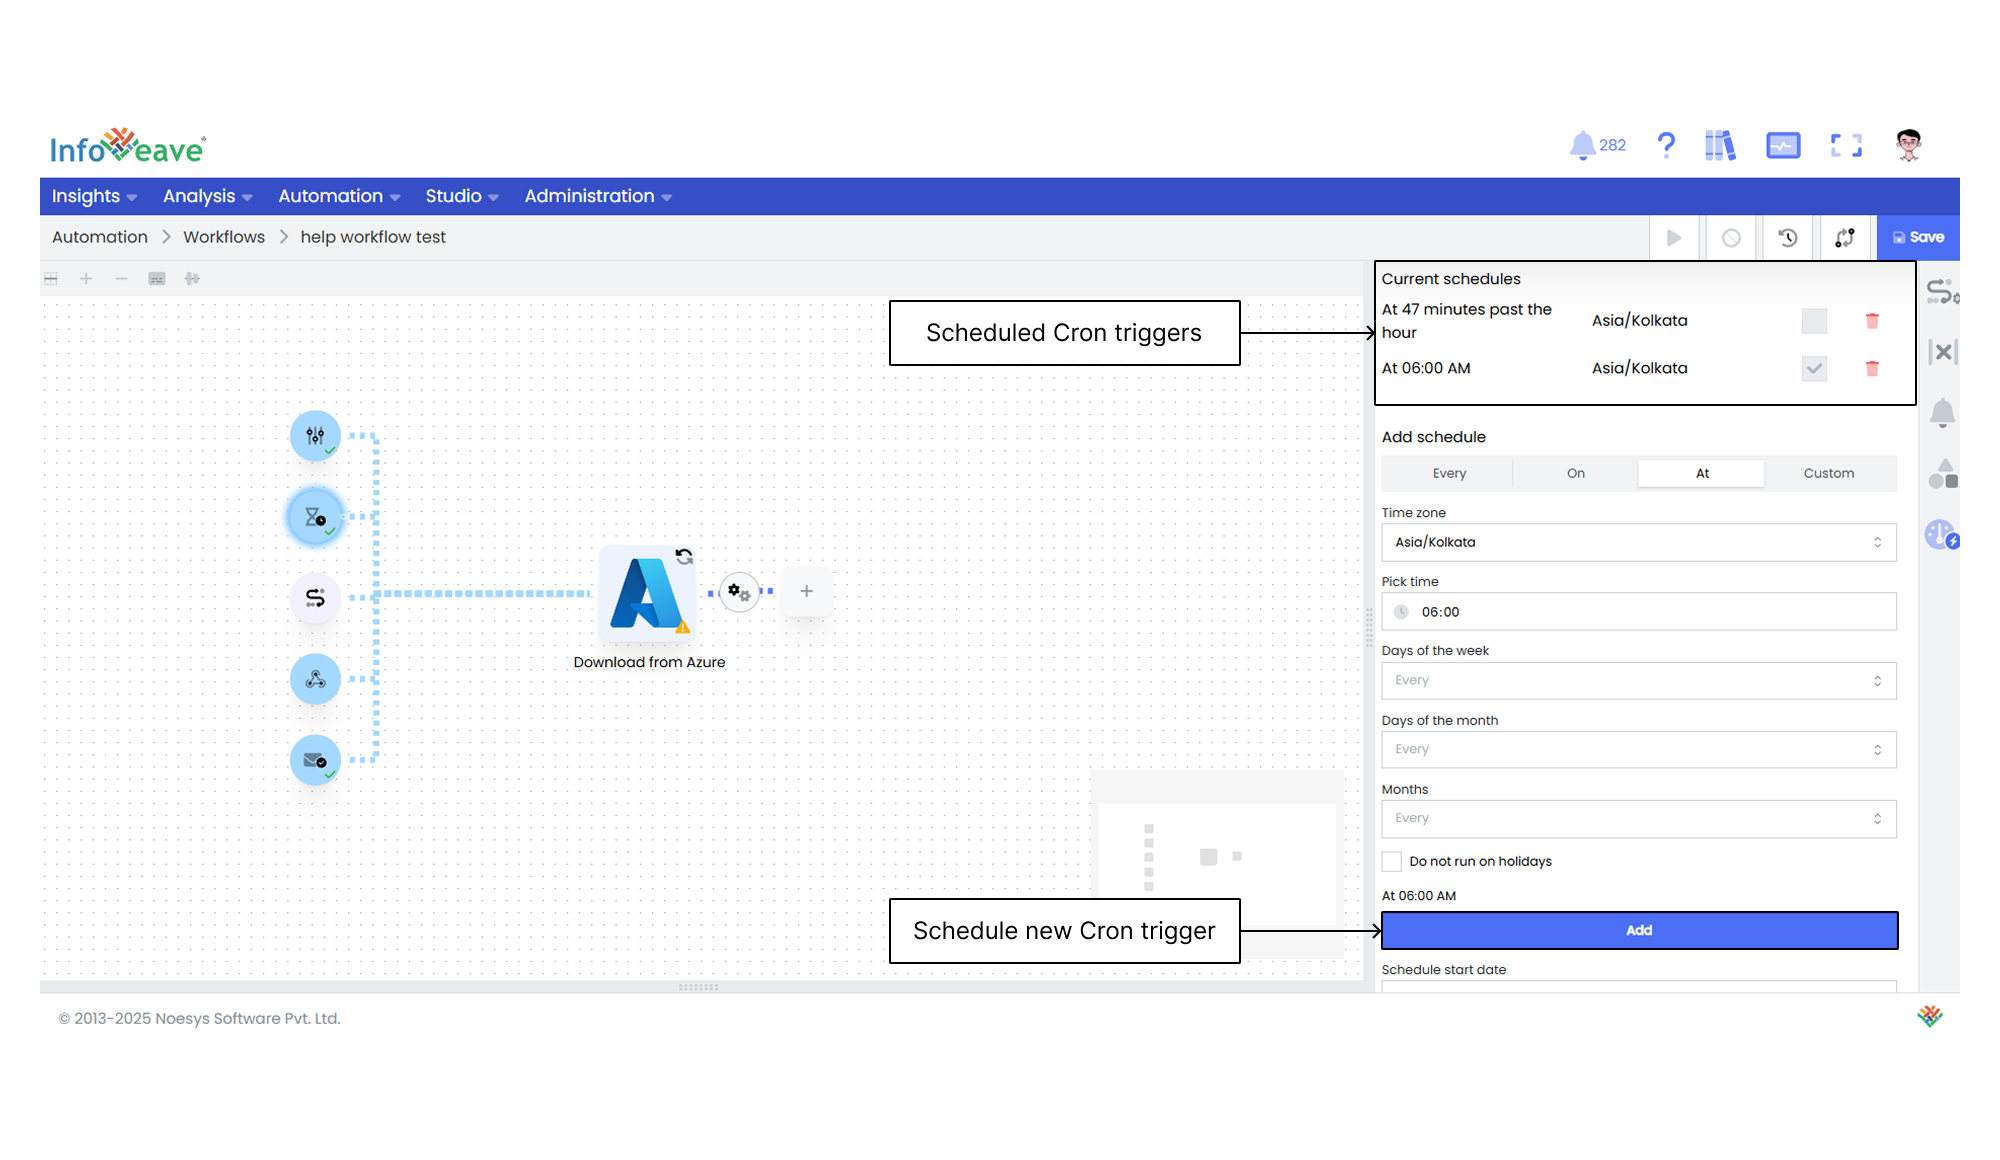
The Cron trigger helps you schedule the time at which a Workflow automatically runs. Infoveave executes the Workflow according to the scheduled time assigned by you. You can schedule the Workflow based on the day and time. Infoveave allows options such as
- Days of the Week
- Days of the Month
- Months
To schedule Workflow automation using the Cron trigger, follow the steps below.
- Select the Cron trigger icon in the Workflow start.
- Select the desired frequency for Workflow execution.
- Choose Every if you want to schedule the Workflow after a fixed time interval such as every 2 hours. Select the appropriate interval value between 1 and 23 hours or 1 and 59 minutes.
- Choose On if you want to schedule the Workflow only at specific times in a day such as 10 AM and 6 PM. Select the desired hour value between 1 and 23 or minute value between 1 and 59.
- Choose At if you want to schedule the Workflow at a specific time such as 6:30. Select the desired hour and minute from the drop-down lists.
- Choose Custom if you want to schedule the Workflow at a custom time.
- Select the time zone from the drop-down list.
- Choose the days on which you want to execute the Workflow. By default, Infoveave sets it to every day. You can select specific days of the week, days of the month, or months.
- Click on the Add button to set the schedule for Workflow execution. The scheduled times will be displayed in a tabular form.
- To Delete a scheduled time, click on the delete icon associated with that schedule.
Webhook trigger
The Webhook trigger allows Workflows to be triggered by HTTP requests sent from external systems. This trigger enables seamless integration with other applications and systems. It allows Workflows to be initiated based on external events or data changes. You can configure the Webhook trigger to listen for specific HTTP requests and trigger the Workflow accordingly. This trigger is useful for building automated Workflows that respond to external events such as data updates or notifications from other systems.
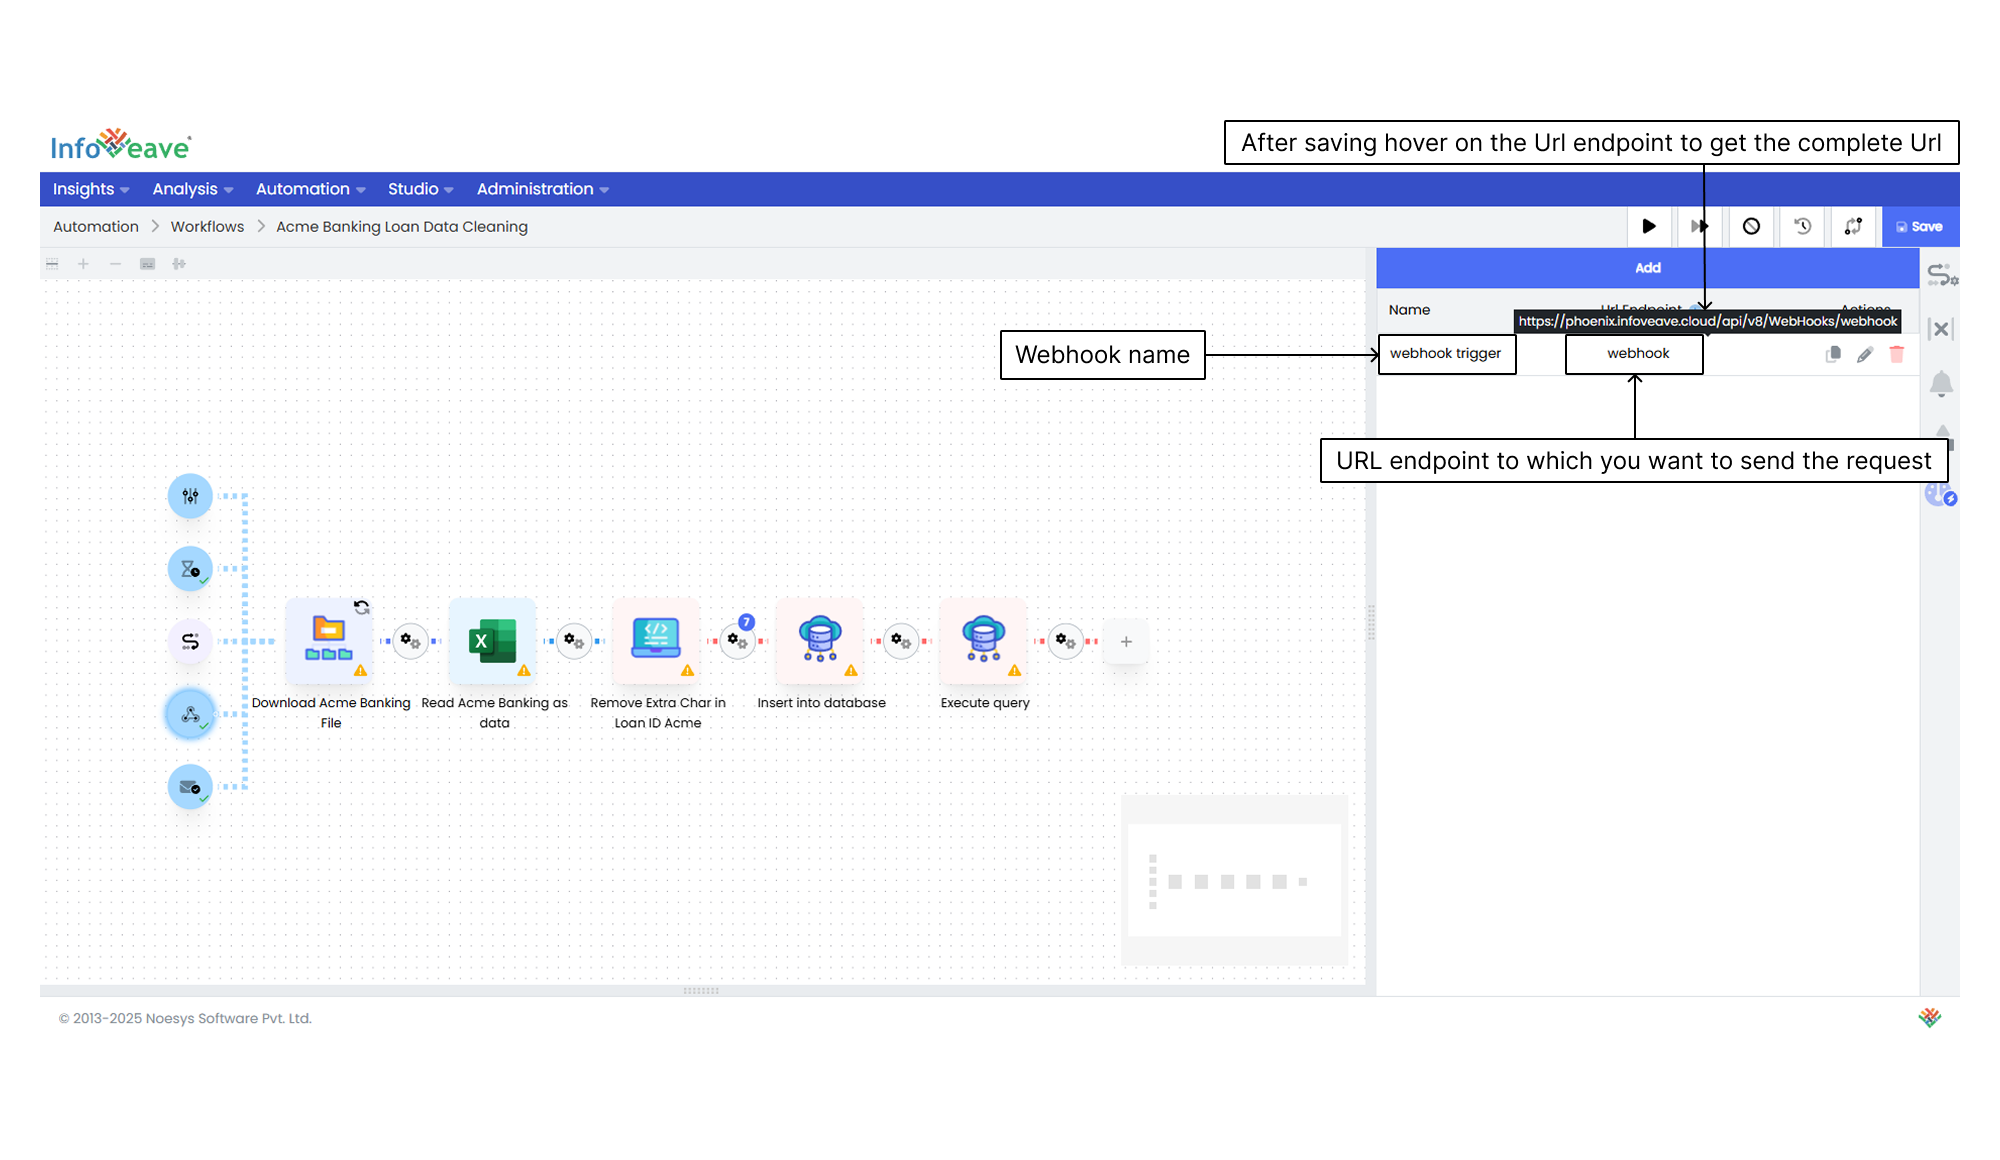
To trigger Workflow automation using the Webhook, follow the steps below.
- Select the Webhook trigger icon in the Workflow start.
- Click on the Add button to start adding the Webhook trigger.
- Enter a Name for the Webhook.
- Define the URL Endpoint in the URL string.
- Click on the Save icon to save the configuration.
- Mouse over the added URL to get the full URL. This will be used for the HTTP post request for the external trigger.
Emailhook trigger
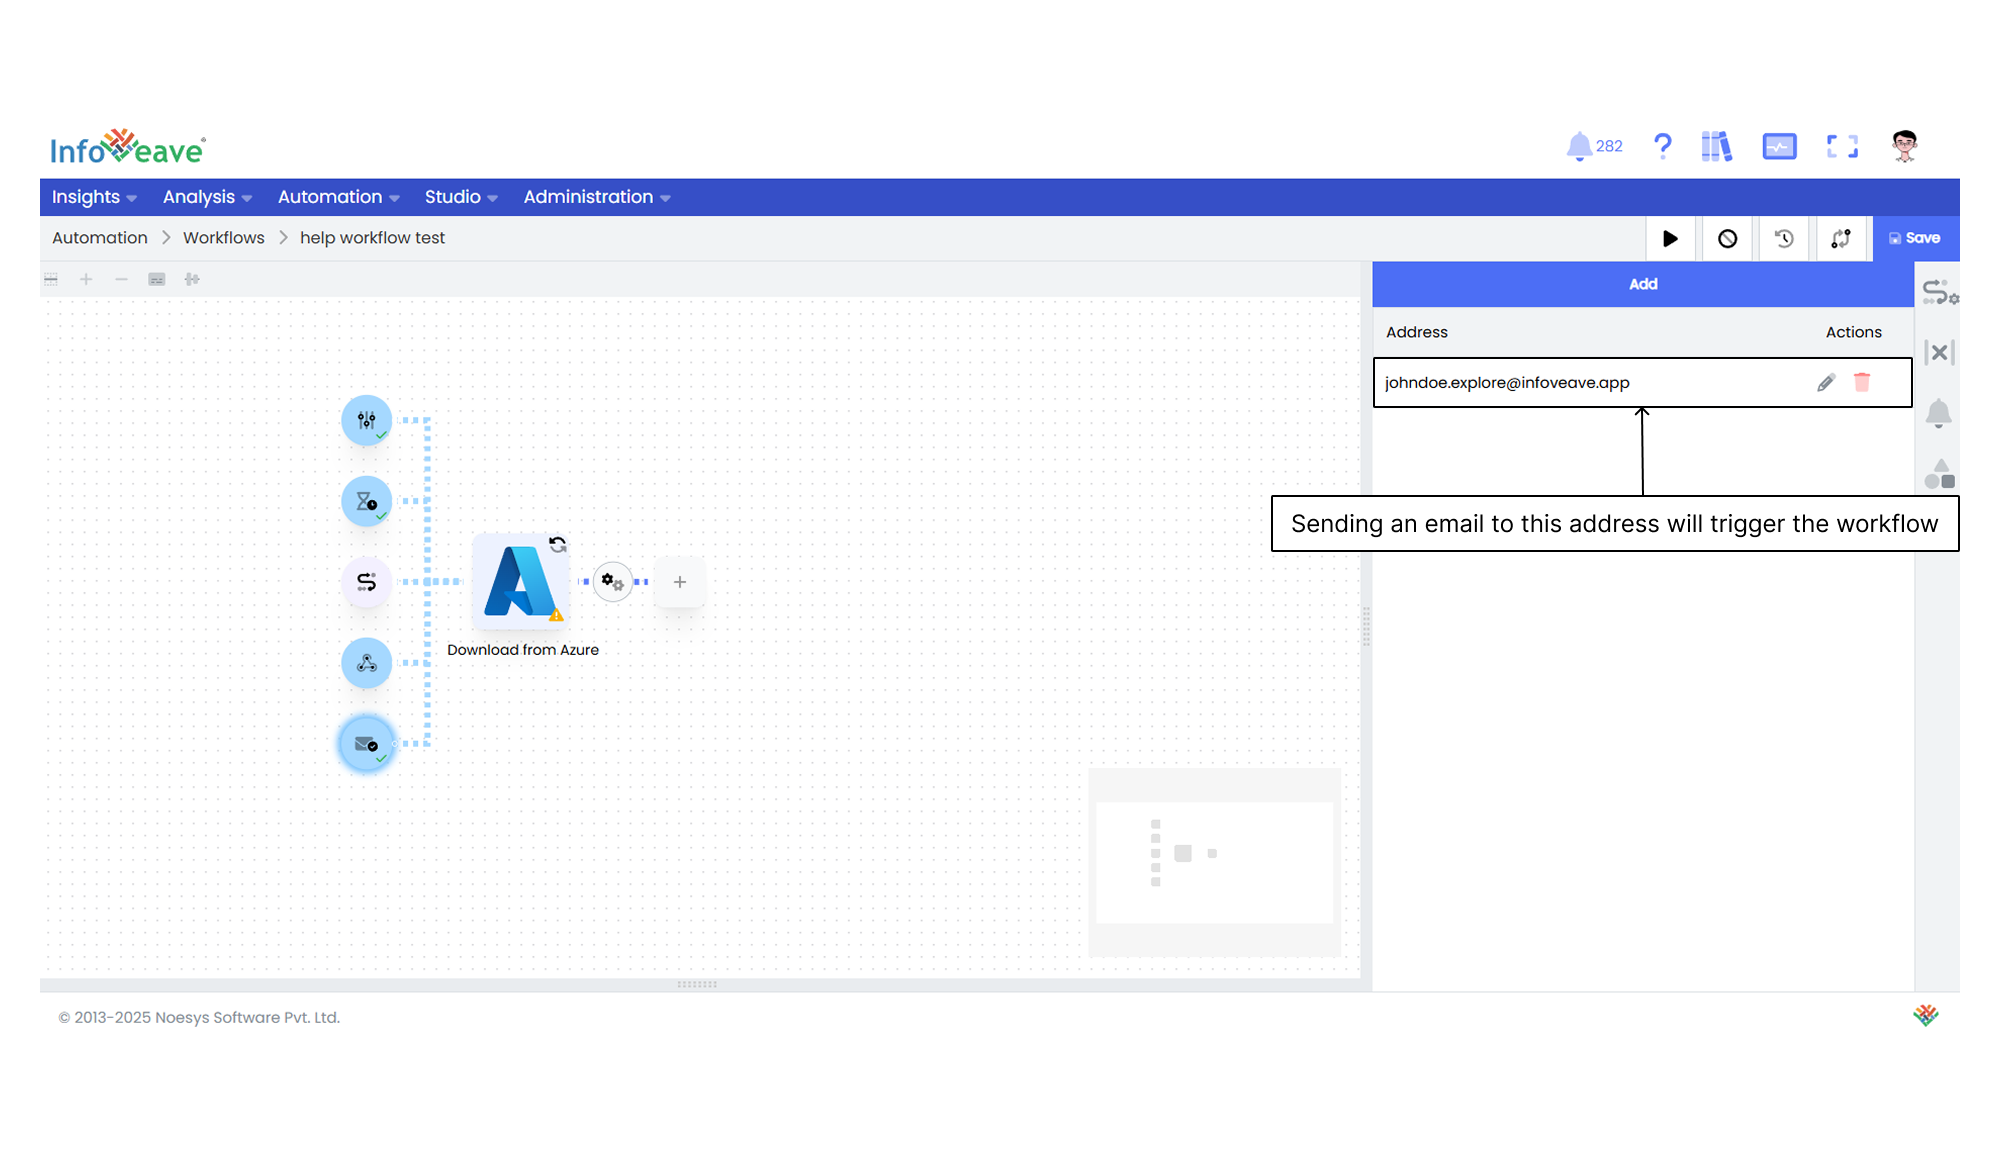
The Emailhook trigger initiates a Workflow based on incoming emails. You can set up specific email addresses that serve as Emailhooks. This allows for automated processing of email-based activities or notifications. This trigger is useful for Workflows that involve email notifications or processing of data received via email.
To set up an Emailhook trigger for the Workflow, follow the steps below.
- Select the Emailhook trigger icon.
- Click on the Add button to add the email address.
- Click on the Save icon to save the configuration.